Hockey is a very physically demanding contact sport with many opportunities for players to injure their shoulders. These usually occur from direct contact of the shoulder with another player, the boards, or the ice. Fortunately, the overwhelming majority of hockey shoulder injuries are mild. Most injuries involve bruising or contusions of the soft tissue. More serious injuries are possible such as muscle strains, ligament and tendon tears. Three of the most common shoulder injuries we see in hockey are shoulder separations (AC joint separations), shoulder dislocations, and collarbone fractures, usually in that order of occurrence.
The chance of sustaining an injury depends on many variables, including the level of participation, player position, protective equipment, pre-existing injuries and style of play. Injuries occur much more frequently in games and increase with each exposure and level of participation. The inherent risk and intrinsic hazards of playing hockey cannot be completely eliminated, but the chance of injury can be significantly reduced.
A few tips for preventing injuries include obtaining a preseason screening examination by an experienced athletic trainer or physician to identify pre-existing injuries, conditions, and to expose any significant muscular deficiencies. Participating in a sports-specific training and conditioning program to avoid physical overload while preparing the body for the demands of hockey.
One of the most important but often overlooked preventative measures for shoulder injuries is obtaining good quality equipment that fits well and is not worn-out, damaged, or undersized. Remember, it must fit well in order to maximize its effectiveness. Make sure shoulder pads fit snuggly and don’t slide all over the place, especially over the collarbones.The shoulder caps should sit square on top of the tips of the shoulders. Measure the circumference of the chest usually one inch below the armpit and follow the manufacturer’s sizing guidelines. Wearing shoulder pads that are worn out, damaged, or ill fitting will increase your chances of sustaining an injury exponentially.
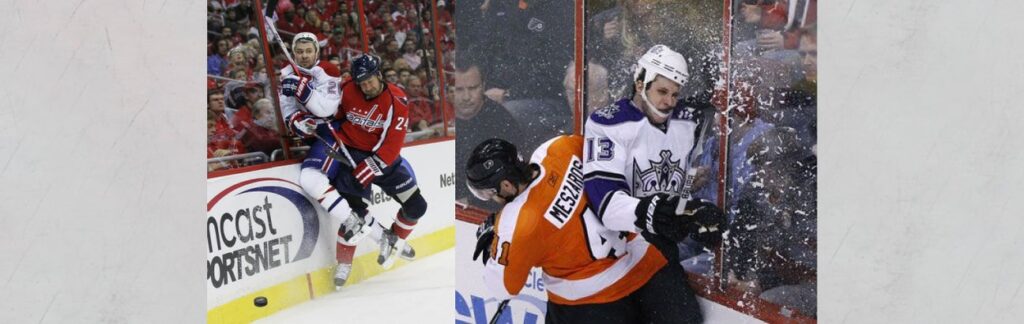
Now let’s circle back to the most common traumatic shoulder injury that I mentioned earlier. This is the shoulder, or AC, separation which involves the acromioclavicular (AC) joint. This is where the clavicle, also known as the collarbone, meets with the top of the shoulder. The most common mechanism, or usual way, this occurs in hockey is when the player gives a hit or takes a hit from the side, laterally. This can involve an opposing player, but many times it occurs as a result of the direct impact of shoulder vs. glass. A player can be checked hard, from the side, into the glass and many times it’s a result of a player missing a check; the intended target maneuvers at the last second and the player makes contact with the glass instead.
Because there are significant opportunities to deliver, take, and miss a bodycheck in hockey you can see why this is the most common shoulder injury in the game. This impact to the lateral aspect of the shoulder and the resulting force pushes the tip of the shoulder down and if severe enough will damage the AC ligament between the acromion and collarbone. The word “separation” is clinically used to describe the three levels, or grades, of this injury. Personally, I refer to Grades 1-2 as “AC sprains” and only refer to a Grade 3 injury, a complete tear or rupture of the AC ligament, as an AC shoulder separation.
 A Grade 1 is a mild sprain with little or no swelling and no anatomical changes or defect. The damage to the AC ligament is minimal and the collarbone doesn’t move. The injured and unaffected shoulders will look anatomically similar in appearance and comparison. While facing your player, with their arms at their sides, you can grab both wrists and gradually pull directly down towards the floor as you observe both shoulders for any step off. Players may not even miss a shift and oftentimes this is not diagnosed until the end of a period, or the end of the game. This should be treated with ice and anti-inflammatory medications.
A Grade 2 can involve a more significant sprain or partial tear of the AC ligament as well as a sprain or slight tear in an additional ligament, the CC or coracoclavicular ligament. The collarbone is no longer aligned properly and you may see a slight bump, or step off; this is the anatomical defect I referred to earlier. A moderate amount of pain and swelling are associated with this injury.
I can often recognize this injury and it’s severity before the player even returns to the bench. You can tell the difference between a player who has sustained an AC shoulder separation and one who has dislocated his shoulder by observing them as they skate back to the bench; the player with the AC injury will almost always hold the arm on his injured side very close to his body, at a perfect forty five angle, while supporting his wrist with his other hand; his back will be straight and rigid. The player who sustains a dislocation will almost always skate towards the bench “hanging”; they will be bent over at the waist and the arm will be hanging towards the ice.
If I suspect an AC injury I will immediately place a hand under his shoulder pad and over the AC joint and ligament. I’m initially evaluating the injury based on how tender it is and if I can feel a bump. Oftentimes, at the professional level, the player will continue to play. I will provide over the counter anti-inflammatory medication and shove a small ice bag under the shoulder pads and directly over the joint between shifts. I will tell the player and the coach that he will continue to play as long as he can and that they should expect that the shoulder will tighten down as the game and time progresses; in other words, don’t be surprised if he doesn’t finish. The worst is when these injuries occur early in a game; anywhere in the first period and it can be a challenge to finish three periods of hockey.
Grades 1 and 2 can be treated with rest, ice, and anti-inflammatory medication. Use pain as a gauge; if it hurts, stop and don’t do it. Some Grade 2 injuries may benefit from a sling for up to 72 hours. They both will require some simple rehabilitation, usually band work focusing on strengthening and range of motion. For the amateur and recreational players this can also be accomplished at home with the proper tools and instruction.
When a player returns to the lineup I will place an additional protective cap under the shoulder pad, directly over the shoulder joint, called an AC Impact Pad; because it seems to be inevitable that just when the player is ready to return to action, is pain free with full range of motion, he’ll go out there and at some point he’ll get whacked directly on the shoulder. This will hurt more than the original injury and can set you back all the way to ground zero. You can help ensure a successful return by utilizing a simple protective cap or padded cover.
The Grade 3 injury is the most severe. This injury usually involves a complete tear or rupture of both the AC and CC ligaments. You will notice a large bump over the shoulder as the joint is now obviously out of position. When I first started my career in professional hockey these Grade 3 injuries were managed and repaired surgically. Eventually, we determined that the procedure itself was painful and the post operative rehabilitation was exceptionally long and challenging. The cost simply did not outweigh the benefits.
When we left them alone and treated it with immobilization and significantly less rest and rehabilitation they returned to full function just as well had it been surgically repaired. The only difference was visually; while the shoulder functioned perfectly the bump remained. This was a fair trade off for almost every player. If you were to walk into any NHL locker room and observe players without their shirts on you would notice that a significant amount of them have at least one, perhaps two, of these AC bumps. They wear them as a badge of honor, a result of the many games and years spent battling in the hockey trenches.
Please feel free to contact me at bill@boltsports.ca or directly on Instagram @billmurrayusa.
A Grade 1 is a mild sprain with little or no swelling and no anatomical changes or defect. The damage to the AC ligament is minimal and the collarbone doesn’t move. The injured and unaffected shoulders will look anatomically similar in appearance and comparison. While facing your player, with their arms at their sides, you can grab both wrists and gradually pull directly down towards the floor as you observe both shoulders for any step off. Players may not even miss a shift and oftentimes this is not diagnosed until the end of a period, or the end of the game. This should be treated with ice and anti-inflammatory medications.
A Grade 2 can involve a more significant sprain or partial tear of the AC ligament as well as a sprain or slight tear in an additional ligament, the CC or coracoclavicular ligament. The collarbone is no longer aligned properly and you may see a slight bump, or step off; this is the anatomical defect I referred to earlier. A moderate amount of pain and swelling are associated with this injury.
I can often recognize this injury and it’s severity before the player even returns to the bench. You can tell the difference between a player who has sustained an AC shoulder separation and one who has dislocated his shoulder by observing them as they skate back to the bench; the player with the AC injury will almost always hold the arm on his injured side very close to his body, at a perfect forty five angle, while supporting his wrist with his other hand; his back will be straight and rigid. The player who sustains a dislocation will almost always skate towards the bench “hanging”; they will be bent over at the waist and the arm will be hanging towards the ice.
If I suspect an AC injury I will immediately place a hand under his shoulder pad and over the AC joint and ligament. I’m initially evaluating the injury based on how tender it is and if I can feel a bump. Oftentimes, at the professional level, the player will continue to play. I will provide over the counter anti-inflammatory medication and shove a small ice bag under the shoulder pads and directly over the joint between shifts. I will tell the player and the coach that he will continue to play as long as he can and that they should expect that the shoulder will tighten down as the game and time progresses; in other words, don’t be surprised if he doesn’t finish. The worst is when these injuries occur early in a game; anywhere in the first period and it can be a challenge to finish three periods of hockey.
Grades 1 and 2 can be treated with rest, ice, and anti-inflammatory medication. Use pain as a gauge; if it hurts, stop and don’t do it. Some Grade 2 injuries may benefit from a sling for up to 72 hours. They both will require some simple rehabilitation, usually band work focusing on strengthening and range of motion. For the amateur and recreational players this can also be accomplished at home with the proper tools and instruction.
When a player returns to the lineup I will place an additional protective cap under the shoulder pad, directly over the shoulder joint, called an AC Impact Pad; because it seems to be inevitable that just when the player is ready to return to action, is pain free with full range of motion, he’ll go out there and at some point he’ll get whacked directly on the shoulder. This will hurt more than the original injury and can set you back all the way to ground zero. You can help ensure a successful return by utilizing a simple protective cap or padded cover.
The Grade 3 injury is the most severe. This injury usually involves a complete tear or rupture of both the AC and CC ligaments. You will notice a large bump over the shoulder as the joint is now obviously out of position. When I first started my career in professional hockey these Grade 3 injuries were managed and repaired surgically. Eventually, we determined that the procedure itself was painful and the post operative rehabilitation was exceptionally long and challenging. The cost simply did not outweigh the benefits.
When we left them alone and treated it with immobilization and significantly less rest and rehabilitation they returned to full function just as well had it been surgically repaired. The only difference was visually; while the shoulder functioned perfectly the bump remained. This was a fair trade off for almost every player. If you were to walk into any NHL locker room and observe players without their shirts on you would notice that a significant amount of them have at least one, perhaps two, of these AC bumps. They wear them as a badge of honor, a result of the many games and years spent battling in the hockey trenches.
Please feel free to contact me at bill@boltsports.ca or directly on Instagram @billmurrayusa.
 A Grade 1 is a mild sprain with little or no swelling and no anatomical changes or defect. The damage to the AC ligament is minimal and the collarbone doesn’t move. The injured and unaffected shoulders will look anatomically similar in appearance and comparison. While facing your player, with their arms at their sides, you can grab both wrists and gradually pull directly down towards the floor as you observe both shoulders for any step off. Players may not even miss a shift and oftentimes this is not diagnosed until the end of a period, or the end of the game. This should be treated with ice and anti-inflammatory medications.
A Grade 2 can involve a more significant sprain or partial tear of the AC ligament as well as a sprain or slight tear in an additional ligament, the CC or coracoclavicular ligament. The collarbone is no longer aligned properly and you may see a slight bump, or step off; this is the anatomical defect I referred to earlier. A moderate amount of pain and swelling are associated with this injury.
I can often recognize this injury and it’s severity before the player even returns to the bench. You can tell the difference between a player who has sustained an AC shoulder separation and one who has dislocated his shoulder by observing them as they skate back to the bench; the player with the AC injury will almost always hold the arm on his injured side very close to his body, at a perfect forty five angle, while supporting his wrist with his other hand; his back will be straight and rigid. The player who sustains a dislocation will almost always skate towards the bench “hanging”; they will be bent over at the waist and the arm will be hanging towards the ice.
If I suspect an AC injury I will immediately place a hand under his shoulder pad and over the AC joint and ligament. I’m initially evaluating the injury based on how tender it is and if I can feel a bump. Oftentimes, at the professional level, the player will continue to play. I will provide over the counter anti-inflammatory medication and shove a small ice bag under the shoulder pads and directly over the joint between shifts. I will tell the player and the coach that he will continue to play as long as he can and that they should expect that the shoulder will tighten down as the game and time progresses; in other words, don’t be surprised if he doesn’t finish. The worst is when these injuries occur early in a game; anywhere in the first period and it can be a challenge to finish three periods of hockey.
Grades 1 and 2 can be treated with rest, ice, and anti-inflammatory medication. Use pain as a gauge; if it hurts, stop and don’t do it. Some Grade 2 injuries may benefit from a sling for up to 72 hours. They both will require some simple rehabilitation, usually band work focusing on strengthening and range of motion. For the amateur and recreational players this can also be accomplished at home with the proper tools and instruction.
A Grade 1 is a mild sprain with little or no swelling and no anatomical changes or defect. The damage to the AC ligament is minimal and the collarbone doesn’t move. The injured and unaffected shoulders will look anatomically similar in appearance and comparison. While facing your player, with their arms at their sides, you can grab both wrists and gradually pull directly down towards the floor as you observe both shoulders for any step off. Players may not even miss a shift and oftentimes this is not diagnosed until the end of a period, or the end of the game. This should be treated with ice and anti-inflammatory medications.
A Grade 2 can involve a more significant sprain or partial tear of the AC ligament as well as a sprain or slight tear in an additional ligament, the CC or coracoclavicular ligament. The collarbone is no longer aligned properly and you may see a slight bump, or step off; this is the anatomical defect I referred to earlier. A moderate amount of pain and swelling are associated with this injury.
I can often recognize this injury and it’s severity before the player even returns to the bench. You can tell the difference between a player who has sustained an AC shoulder separation and one who has dislocated his shoulder by observing them as they skate back to the bench; the player with the AC injury will almost always hold the arm on his injured side very close to his body, at a perfect forty five angle, while supporting his wrist with his other hand; his back will be straight and rigid. The player who sustains a dislocation will almost always skate towards the bench “hanging”; they will be bent over at the waist and the arm will be hanging towards the ice.
If I suspect an AC injury I will immediately place a hand under his shoulder pad and over the AC joint and ligament. I’m initially evaluating the injury based on how tender it is and if I can feel a bump. Oftentimes, at the professional level, the player will continue to play. I will provide over the counter anti-inflammatory medication and shove a small ice bag under the shoulder pads and directly over the joint between shifts. I will tell the player and the coach that he will continue to play as long as he can and that they should expect that the shoulder will tighten down as the game and time progresses; in other words, don’t be surprised if he doesn’t finish. The worst is when these injuries occur early in a game; anywhere in the first period and it can be a challenge to finish three periods of hockey.
Grades 1 and 2 can be treated with rest, ice, and anti-inflammatory medication. Use pain as a gauge; if it hurts, stop and don’t do it. Some Grade 2 injuries may benefit from a sling for up to 72 hours. They both will require some simple rehabilitation, usually band work focusing on strengthening and range of motion. For the amateur and recreational players this can also be accomplished at home with the proper tools and instruction.


